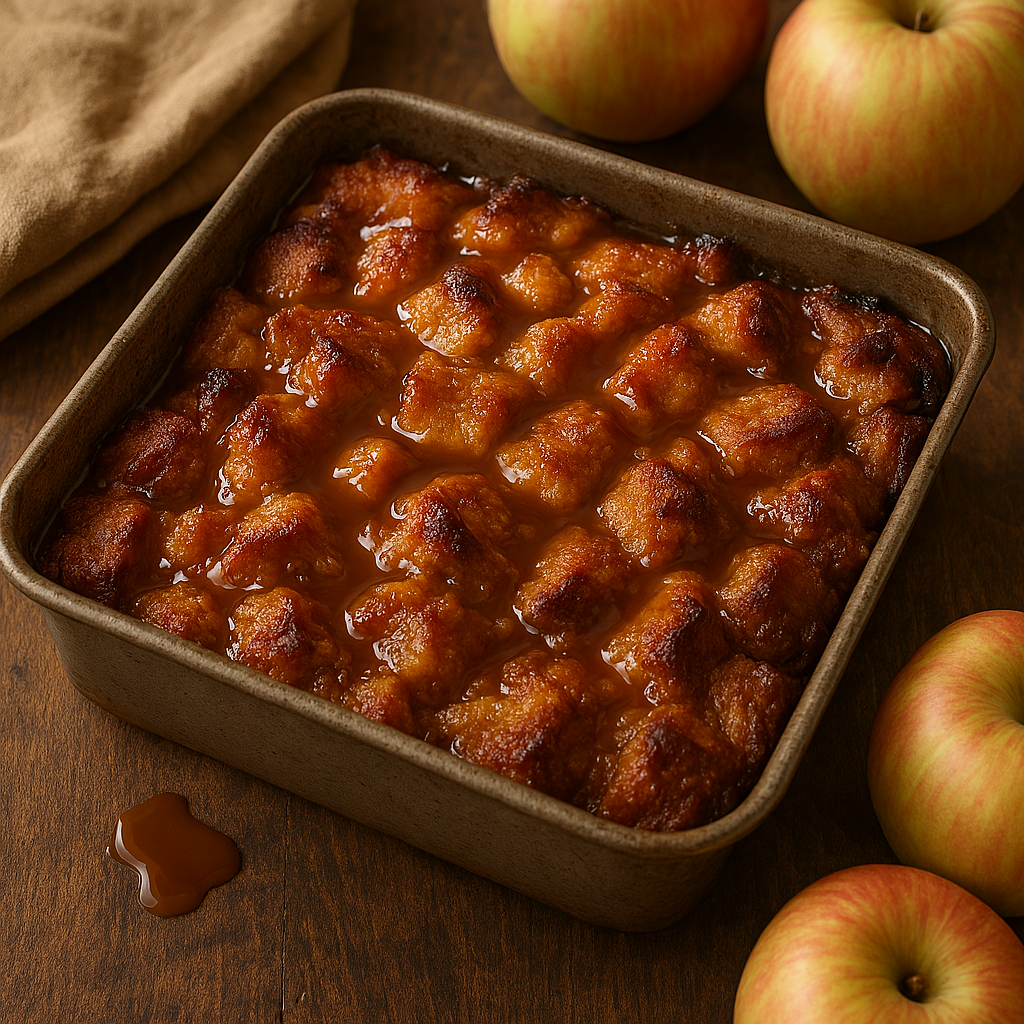
fbpx

Classes and Changes

I Know...It's Been a While

Never in our cooking school history have I (Chef Valerie) been so busy!  The classes are usually well occupied and numerous.  This summer’s kid’s classes are packed and I am adding three more.

What I am leading up to is….I’m sorry there have been so few blog posts this year.

But here one is!

Upcoming Adult Classes

This isn’t a comprehesive list of upcoming classes, but it is a list of the ones with availability.  To see the entire schedule, click here.

Classes with availability are:

How to Series: Great Gravy – July 21st @ 5:15 pm – $29 (Make and take White Gravy & Brown Gravy)

How to Series: Create a Charcuterie Board – July 23rd @ 1:00 pm – $29

How To Series:  The Art of Pasta – July 25 @ 2:00 pm – $25  (a great intro to making all pasta)

Pasta:  Lasagna – July 29 @ 10:00 am – $45 (make the actual pasta noodles and an entire lasagna – take an 8×8 lasagna home too!)  BTW:  July 29 is National Lasagna Day!

How to Series: Convection Cooking – August 3 @ 5:15 pm – $25 (A great way to get comfortable with convection ovens and air frying)

Kid's Classes

Never before has the demand for summer kid’s courses been this huge.  I just added 4 more of the Yound Chef’s Series.  I had to skip session 1 in the interest of time, but am accepting kid’s to start the series with session 2.  They can take a class as a standalone if they have completed the class before it.  For example, I have kids complete the current series through session 3 but had family camping plans making them miss session 4, so I encourage them to pick up at session 4.  

The kid’s classes (all for ages 11 and up) with availabilty are:

Young Chef Session 2- Baking and Pan Frying – July 31 @ 11:00 am – $45

Young Chef Session 3 – Food Safety and Pastry – August 21 @ 11:00 am – $45

Young Chef Session 4 – Knife Skills and Fruits/Vegetables – August 22 @ 11:00 am – $45

Young Chef Session 5 – Skills Demonstration – September 10 @ 1:00 pm – $60

Embracing Freshness and Minimizing Food Waste: Exciting Changes to Our Offerings!

Greetings, food lovers!  As a passionate culinary enthusiast, I have always strived to provide you with the most delicious food options. To further enhance your dining experience and address the challenges I’ve faced recently (such as increased class load and decrease grab n go demand), I am changing our offerings.

Chef Valerie Hanson Welcomes you!

In a commitment to reducing food waste, I have made the decision to discontinue our grab and go options. Unfortunately, due to the limited demand and the short shelf life of these items, I have experienced an increased amount of food going to waste. I believe that it’s crucial to prioritize freshness, ensuring that every dish we serve meets our high standards of quality and taste.

Fear not! I am not abandoning the idea of offering extra dishes entirely. Instead, just shifting my focus to the creative dishes born from our cooking classes.  For example, whenever I have an upcoming class, such as the Quiche class on July 17th, we will announce in advance the availability of a limited number of dishes inspired by that class.

For example, on July 18th, we will have five mouthwatering quiches available for purchase.

These dishes will be prepared with care, showcasing the skills and techniques used in classes.

One more interesting offering. I offer my services as a personal chef to a limited number of households. If you’re looking for weekly meal(s) tailored to your specific requirements,  I’ve got you covered! Simply reach out me so we can discuss foods that satisfy your cravings and dietary needs.

In addition to our personalized household meals, we are delighted to continue to accept orders. Whether you’re craving a delectable pie, a gourmet pizza, charcuterie board, a loaf of our famous sourdough bread, or even something you simply crave (my goulash or pot pie for example!) I can craft the perfect dish just for you. Simply let me know what you’re in the mood for, and we’ll bring your food desires to life.  DO give advanced notice! At least 24 hours please.  You can also order items from our online shop.

I appreciate your understanding and support in this change.


Cooking Classes – Not a Lot of Thyme

Not a Lot of Thyme

Hello friend!  It has been a while since I reached out with a blog post.  This one will be fairly short and here’s why: Art of Cookery is busier than it has ever been since opening in 2009.  Cooking classes are occurring more often and are bigger than ever.  People are coming from further away than ever too.

WOW that is humbling

It is also winter, and I miss my fresh herb garden.  Thus, the title (Not a lot of thyme).  See what I did there?  🙂

Upcoming Classes

Many upcoming classes are booked out, but here are some with space still available:

Click on the class title to read more about it and book online.

We are shut down for our yearly re-set and R&R between mid-Feb through mid-March.

Retail Food Menu

We’ve been doing retail food orders for a bit over 1 year now.  Below is the menu for 1/16 – 1/31.  Feel free to order now for pick-up during that time frame.  Ordering early helps me schedule things.  As we start the new year, I’ve made a few diets conscious menu choices.  Keto seems to be the big thing.

Feel free to contact me privately and ask for a food/diet meal that is not on the menu, but know it isn’t likely to occur for pick-up the same day, but you never know.  I am some people’s apparent private chef who take advantage of this.

Did you Know?

  1. We take private cooking classes and they don’t need to be on my class listings.  For example, your group wants to learn about cooking with herbs; or, how to use a Tagine.
  2. We do Murder Mystery dinners, called Delicious Demise, by private request.  Minimum of 6 people.
  3. We do about 4-5 small catering events each year.  Inquire if you are curious about your event.
  4. You can order off our menu for a hot and ready to eat meal, we just need a heads-up.
  5. We do Bachelorette/Bridal Party events.

Class Suggestions?

We are always open to suggestions for class topics.  Just reach out via email at ICan@artcookery.com.

Winter Wanderland

I know I said this would be short.  Here’s the last item… Winter Wanderland 2023 is coming up.  John and I are founding members and very involved in this weekend event.  Click HERE for the events/times/locations occuring for the 2/3 through 2/5 weekend event.


Get LIT!

Get Lit UP with Grilling

Spring is here (well on the calendar anyways)!  That means warmer weather and the beginning of grilling season.  Quite honestly most Michigan grillers are die-hard and will shovel snow out to the grill for a winter meal of ribs.  One of the joys of life is enjoying a late spring afternoon hanging out in the yard, grilling up delicious food for your family and friends. 

But wait, you don’t know how to grill, you don’t even have a grill, or have you tried before but failed?  Well, keep on reading for some basic tips and advice that will give you the basic knowledge and confidence to get out grilling this spring.

First Thing First, the Grill.

So, what is the perfect grill to start off with?  The answer depends on your needs and your level of comfort.  The first question is gas or charcoal?  While charcoal gives extra flavor and makes all the neighbors mouths start to water, they do need more time and attention.  You need to fire up the coals, get the grill to the right height for what you are cooking, and even adjust this as you cook.  Flare-ups are also more of a problem with charcoal. You’ll need a water bottle close by to keep those flames down while cooking fatty meats.  A much better option for a beginner is gas.  You still get great flavor and setting, adjusting, and maintaining the temperature is a breeze.  If you clean the grill properly, flare-ups are rare on a gas grill.  Over the years, we have bounced between gas (for it’s ease) and charcoal (flavor!)

The next question is how many people do you plan on grilling for?  Yes, the big fancy bar-b-que island looks awesome, but it is just overkill if you are only grilling occasionally on weekends for one or two people.  Start by figuring out how many square inches you will need.  This is how they measure the cooking surface.  You want about 70-80 inches per person that you are grilling for.  Most small gas grills start out at 430 square inches.  That is perfect for a family of four or even newlyweds that are just getting started grilling.  If you have a bigger family or plan on hosting big get-togethers often, you’ll want something bigger.  Just keep in mind that the correct size grill will be for the majority of your use.  You can cook for as many people as you want on any size grill, it will just take more time to get everyone fed, which means you get to chill outside by your grill longer. 

We have settled on a Weber Performer and adore it.  (That wasn’t a paid ad.  Just letting you know what we’ve come to love.)

Got the Grill. Now, What to Cook?

Let’s start with the meat.  Hamburgers and hotdogs are a great and affordable way to learn to grill.  You’ll find your hot and cool spots and how to move your meat around to get consistent doneness.  Don’t forget to toast the buns on that top rack if you have one!  Once you practice a few times, step it up to steaks that have good marbling.  Just ask the butcher what he has that is good to grill if you’re not sure.  Turn up the heat or use the searing station on the grill for a quick sear, about two minutes per side.  Then turn it down and grill each side for another five minutes per side, or until the desired doneness is reached.  One great tip for steak is to set it out before grilling and let it come to room temperature.  

A great alternative protein to beef that works well for beginners is salmon.  Buying a fish grilling basket makes life much easier.  However, you can grill right on the bars, or even use a cast iron pan set on the grill.  Salmon goes with all types of seasonings, so choose your favorite or just add salt and pepper.  Put it on the grill (or CI skillet) skin side down over medium-high heat until you see the white fat start to bubble up on top and the color of the meat turns light pink and flip it over for a couple of minutes to char the top a little.  The skin will pull away from the meat easily so you can plate it up with or without skin.  

Now for sides.  A great side dish for salmon is grilled asparagus.  Put one bunch in a plastic bag with oil, soy sauce, and garlic powder.  Let it marinate for an hour or just shake it up for a few minutes.  Grill on low until tender.  Another great side dish for the grill is sweet peppers.  Once again, a veggie grill basket makes cooking these much easier.  Potatoes and corn on the cob reach an entirely new level when you finish them on the grill.  Cook them in the kitchen like you normally do but put them on the grill with some olive oil, salt, and pepper.  Turn them often until they crisp up evenly.  They are always a hit.  Once you get comfortable cooking on your grill, experiment.  There is no limit to flavor when you start using different herbs, spices, and marinades. 

One more thing….think outside of normal.  Make a pizza on that grill!

Need More Help?

The best way to learn tips and tricks to grilling is to ask friends and family.  If you know someone who loves to grill, it’s a safe bet that they also love to talk about grilling.  The internet is full of information on everything grilling. 

Just remember to keep it simple in the beginning, online grilling sites can be a little overwhelming. 

Upcoming Classes

We are pretty booked for a little bit.  But here are the next classes that have availability:

HOW TO SERIES:  Mother Sauces – Tomato Sauce 4/14 @1 pm, $24

HOW TO SERIES:  Mother Sauces – Espagnole 4/19 @5:15 pm, $24

Lasagna (complete with making your own noodles) 4/21 @11/15 am, $38

Pickle Party (learning to can pickles) 4/28 @5:30 pm, $29

You can book online using the clickable titles above, or send me an email ICan@artcookery.com

Food Menu

Order ahead, please.  If I have extra, I will post on facebook.


Herbs or Erbs?

How is it pronounced?

In the USA we skip the “H” and say Erbs.  In the UK it is pronounced herbs with the h-sound.  How is it pronounced where you are?

Herbs are Vital for Cooking

What would dining be like if we didn’t have herbs? 
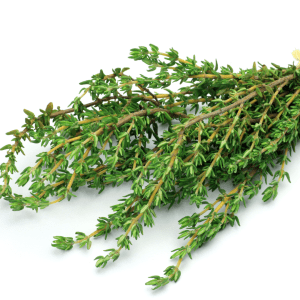
Before the first humans decided to throw some rosemary or sage on their venison, I am sure it was mighty bland. The addition of herbs can be a powerful tool in cooking that can really make or break a dish. So, how to use them?

Cooking with Herbs can make all the Difference in a Dish

Some truly delicious meals are made when a combination of herbs are added at different times in the same dish. For instance,

New Mexican Posole

a truly divine posole (a New Mexican stew – Recipe at bottom of the post) may have dried coriander added to the pot at the beginning of it’s simmering time, then finished off with some glorious fresh cilantro after you’ve added a good-sized ladle to your bowl.  (Did you know that cilantro and coriander are the same plant?  In the US we refer to the plant as cilantro and its seeds as coriander.  In Europe it is all called coriander.)  Another option is to let someone else (like Art of Cookery) do all the hard work, then add your own pizzazz at home. Give us a call and we will reserve our yummy meals for you (see this week’s menu below), then you can pick it up and discover that we use a 

lot of herbs to brighten it up a bit. Could there be anything better?

Here’s a great herb guide

Rules of Thumb

A general rule of thumb is that dried herbs are added at the beginning of cooking to help them soften and release their flavors, and fresh herbs should be added at or near the end to bring out their fresh and delicate flavor in the finished dish.

Another thing to keep in mind is that dried herbs typically have a more intense flavor than fresh herbs. So keep this in mind when making substitutions, or when you feel like winging it and not following a recipe.  A good ratio to use is 3:1 fresh to dried (1 TBSP fresh is 1 tsp dried). Say you’re using a recipe for a marinara that calls for a teaspoon dried basil, but you happen to have found a gorgeous bunch of fresh basil on your trip to the store. No problem! Just omit the basil when the directions say to add it at the beginning, then stir in 1 tablespoon of chopped fresh basil into the pasta right before serving. 

Save a little of it to sprinkle over your plated pasta for a feast for the eyes as well as the palate.

Here at Art of Cookery we love to create artful and delicious food, and to show you how to do so as well, so be sure to scroll through more of our blog for lots of ideas and recipes that you can make your own. Also check out our classes and register for some to really up your food game.  See you soon!

Menu for this Week

Please order ahead if you can, it helps so much with planning.  I do try to make more than what is ordered and keep it in ‘fridge at the front of Art of Cookery for quick grabs (pay via Venmo or Cash).  My venmo address is on the front of the refrigerator.

Upcoming Classes

Old Fashioned Donuts – 3/22 @5:15 pm, $24

Sourdough Bread – 3/29 @12 noon, $40

New Mexican Posole

This is a perfect taste of New Mexico
Prep Time15 minutes
Cook Time2 hours 10 minutes
Using Pressure cooker30 minutes
Course: Main Course
Cuisine: Mex-Tex
Keyword: Posole, Soup, Stew
Servings: 4 quarts
Cost: $20

Equipment

  • 1 Dutch Oven Or, an electric pressure cooker
  • 1 wooden spoon to stir
  • 1 mesh strainer
  • 1 blender
  • 1 rubber spatula to press the chilies through the strainer

Ingredients

  • 2 tbsp oil divided
  • 5 guajillo chilis stems removed and cut into three large pieces
  • 2 roma tomatoes quartered
  • 2.5 c boiling water
  • 2 lb boneless pork roast cut into 1" chunks
  • 3 tsp coriander seed
  • 1 1/2 lg onion chopped
  • 8 garlic cloves minced
  • 4 tbsp corn starch optional, only if you want it thick
  • 2 bay leaves
  • 1 1/2 tbsp Mexican oregano
  • 4 15 oz cans white hominy or garbanzo beans drained and rinsed, a blend of half and half is nice.
  • 5 c chicken broth
  • 1 1/2 tsp salt Or to taste
  • 1/2 tsp black pepper
  • 4 tbsp lime juice
  • 1 tbsp sugar optional
  • 1/2 c chopped cilantro plus extra for garnish
  • Garnish Suggestions: radish, avocado, red onion, lime wedges, tortilla chips, cherry tomatoes, basil

Instructions

  • In a Dutch oven, sauté chilies in 1 tablespoon oil over medium heat until heated through, don't brown. Transfer chilies to a bowl; add boiling water. Soak them while you do the next step.
  • In the Dutch oven, brown pork in remaining oil in batches, sauteing coriander seed, onion, and garlic with the last batch of pork. Return all pork to pan and add broth. Bring to a boil. Reduce heat; cover and simmer until meat is tender, 30 minutes.
  • Transfer chilies and their liquid and Roma tomatoes to a blender; cover and process until smooth. Press through a mesh strainer, reserving pulp and discarding skins/seeds. Add pulp to pork mixture. Stir in the hominy (or garbanzo), bay leaves, oregano and salt. Cover and simmer, 30 minutes.
  • Stir in lime juice and cilantro.
  • To serve, ladle into bowls. Optional: to garnish, spread a row of radishes around the curve of the bowl. Sprinkle red onions and cilantro on top. Place lime or lemon wedges and tortilla on plate next to the bowl.

Using an Electric Pressure Cooker

  • Place oil in cooker and press saute. Add the peppers and sauté 2 minutes.
  • Pour 2.5 c hot water over peppers and bring to a simmer. Press Cancel. Put on cover.
  • Pressure cook at high for 2 minutes. Quick Release. (At this point you can skip the release and turn it off and just let it sit overnight and you can proceed the next day.) Pour contents into a blender, add tomatoes and puree. Pour into a mesh strainer set over a container. Push with rubber spatula until only skin/seeds remain in strainer.
  • Meanwhile, in cooker, add more oil and cook pork in batches over a high temp sauté. When the last batch is no longer pink, add the coriander, onions and garlic. Cook 2 minutes.
  • Add cornstarch and stir to coat everything. Add all other ingredients, EXCEPT the lime juice and cilantro. Stir, cover, and pressure cook at high for 5 minutes. Natural release for 15 minutes.
  • Open and stir in lime juice and cilantro. Garnish and serve.

Notes

NOTE: If the stew is too thick, add additional broth or water. If too thin, break out an additional can of hominy or white beans, puree in blender and add to the posole. Bring back to a simmer.
A good alternative to hominy are garbanzo beans.

Goulash. Comfort Food at its Best.

I Loves Me Some Goulash

It’s still the depths of winter here in Michigan.  This is my least favorite time of the year.  Winter has drug on and on and we just want a bit of spring.  March is depressing as it is a bleak,

Traditional Hungarian Style Goulash

muddy, dirty snow, cold month, prolonging winter (at least that is my opinion).  My recipe is below.

Comfort food is my response to my serious case of Seasonal Affective Disorder (SAD).  Goulash is a favorite remedy.  In wintry weather, a hearty meal always hits the spot.   I was wondering about goulash recently. 

I know the version I make is different from a traditional Hungarian dish.  So here is a little in-depth look at one of my favorite foods. 

Goulash, a traditional Hungarian stew, has risen in popularity in the United States in recent years. Originally made with beef, tomatoes, onion, green peppers, and paprika, it was a filling meal for farmers to make quickly on the go. 

In America

Goulash Served with Rice

Goulash in America is quite different from the traditional Hungarian stew. The original is quite basic, and sometimes served with a starch such as carrots or potatoes. American goulash is essentially a meat sauce, almost always served over elbow macaroni. Other variations include using ground beef, or serving it over rice or egg noodles.

Twists on a Classic

If you’re interested in goulash and want to make it your own, try one of these substitutions!

  • try pork or veal instead of beef
  • add root vegetables like sweet potato and parsnips for more flavor
  • go veggie by swapping cannellini or kidney beans for beef
  • save time and effort by making a baked goulash

As such a malleable dish, goulash can be adapted to a variety of diets. It can easily be made gluten-free, vegetarian (even vegan!), dairy-free, and more. 

Still Not Sure?

If cooking seems too intimidating or complex, not to worry. Art of Cookery has plenty of cooking classes to cover the basics and the complexities of the art of cooking!  Not local to Whitehall and surrounding areas?  You can also book a private online lesson anywhere in the U.S.A. I (Chef Valerie)  will help you grow and develop a deep sense of connection, both with cooking and the very food you make. 

My Goulash!

Life is hectic. If preparing a home-cooked meal is enticing, but you don’t have the time in your busy schedule, and you are local to Whitehall, check out our selection of retail food. Art of Cookery has a rotating weekly menu of both prepared foods and meal kits. We even have goulash! Whether you have a few minutes to cook a meal kit or just need to grab a quick bite, we’ve got you covered.  Watch for a weekly new menu on our website, (click here) and also pinned to the top Facebook post for each weekly menu and order right away.  The food is made per order and not in advance ideally.  Although when we do make a batch to fill an order, we make extra and place it in fridge at the front entry for last minute grab and go pick ups.

Upcoming Classes

We are closed for a bit of a break until March 10.  But, so you can plan, here are the next upcoming classes:

Click here to access our website and click the red Calendar Button to see all classes on the calendar.

Magical Goulash

My version of this versatile comfort food. ONE PAN WONDER! Be sure to check out the notes at the bottom for ways to adapt it to your preferences. It is almost magical in how it always turns out. It can be as listed, vegan, vegetarian, keto....nearly anything.
Prep Time10 minutes
Cook Time20 minutes
Course: Comfort Food, Main Course
Cuisine: American, Hungarian
Keyword: Goulash, Macaroni
Servings: 4 people
Author: vkhanson

Equipment

  • 1 Dutch Oven w/lid
  • 1 Stirrer Spatula, Wooden spoon, Pancake turner
  • 1 Cutting board
  • 1 Knife

Ingredients

  • 1/2 tbsp oil EVOO is nice but any fat will do.
  • 1/2 cup diced Onion
  • 1/2 cup diced Bell pepper Using green pepper adds visual color but any works.
  • 2 large cloves garlic, minced Add a 3rd if you love garlic!
  • 1/2 lb ground beef See notes for alternatives.
  • 1 14-15 oz can diced Tomatoes
  • 8 oz water rinse can with it before adding. Can also use white wine or broth or a blend.
  • 1 tsp Chili powder
  • 1/2 tsp Paprika Smoked, sweet, or regular.
  • Salt and Pepper to taste Start with 1 t salt and 1/2 t pepper and adjust at the end.
  • 3 oz Macaroni, dry or other small pasta (3/4 cup)
  • 1 tbsp chopped fresh Basil Cilantro or Parsley work well too.
  • 1/2 c shredded Cheddar Or other favorite cheese. Skip if making Vegan.

Instructions

  • In Dutch oven over medium high heat, add oil. Once heated, add onion, bell pepper, and pinch of salt. Sauté for 1 minute to flavor the oil.
  • Add ground beef and garlic. Cook until meat is browned.
  • Stir in tomatoes, rinse can with water and add water.
  • Add chili powder, paprika, salt and pepper. Stir and bring to a low boil.
  • Add macaroni. Stir and bring back to low boil. Cover but stir frequently.
  • Simmer for 15 minutes. Add additional water if the pasta needs more to cook through (different sized pasta require varying amounts of liquid.)
  • Add basil and cook one minute more. Check for salt and pepper to your liking. Top with cheese.

Notes

How to adjust.  (This is really a great tutorial on pantry cooking and substitutions)
Starch (Pasta) substitutions:
  • ¾ c. (3 oz) any small pasta like macaroni, uncooked
  • 3 oz dry spaghetti, broken into small lengths
  • ½ cup dry rice, cook an extra 5 minutes for white and 10 for brown
  • 1 large or 2 smaller potatoes, washed and small diced
  • 1 c. fresh or frozen gnocchi, or small pierogi
  • Small batch of spaetzle
  • 1 cup fresh or frozen corn (or 1 14oz can)
Protein substitutions:
  • ½ lb any ground or diced meat. 
  • 4 to 8 oz mushrooms, sliced
  • 6 oz firm tofu (just add the salt, pepper, and half the chili powder with the tofu)
  • 1/3 cup dry quinoa (can be used as a starch also)
  • ½ cup bulgur
  • 1 14oz can of beans
  • ½ lb. any type of sausage (reduce the salt & pepper) (a strong chorizo would need you to reduce the chili powder also…taste and season at the end)
  • ¾ to 1 cup cooked lentil (or at least soaked in salt water for an hour)
Aromatics substitution examples (The onion, green pepper, and garlic in the above recipe are aromatics):
  • 1/2 c. of one, or a blend of, shallot, green onion, leek, red onion; OR use ½ TBSP onion powder; OR 2 oz pickled pearl onion
  • ½ c. of one, or a blend of, any color bell, poblano, jalapeno (will be hot), fine diced carrot, celery, fennel bulb; OR ¼ oz dried mild chilies; OR up to ½ tsp dry chili flakes
  • 2 cloves garlic, diced: use of one, or a blend of, 1 ½ tsp pickled minced garlic, 1 ½ tsp garlic powder,1 ½ tsp minced dried garlic, 1 ½ tsp favorite seasoning
Tomato substitutions:
  • Use: 1 14 or15 oz. can of whole, diced or stewed tomatoes and increase water to achieve 23 oz, food process fresh tomatoes to achieve 2 cups
  • 8 oz tomato sauce and increase water/wine/broth to 15 oz
  • 4 oz tomato paste and increase water so the total of water and paste equal 22 oz
  • 15 oz (or close to that) jarred pasta sauce plus water to equal 23 oz
  • 23 oz tomato juice
  • 1 can tomato soup plus water/broth to total 23 oz
  • If no tomato options available use 23 oz of a blend of wine, stock/broth, canned soup of choice, and/or bouillon and water (you may wish to include some cumin and/or paprika to kick in some flavor)
Seasoning substitutions:
  • Instead of 1 tsp chili powder & 1/2 tsp paprika, consider one or a blend of up to 2 tsp: cumin, paprika, chipotle powder, chili powder, or steak seasoning/rub blend
  • ½ TBSP Italian seasoning, or skip all seasonings (including salt & pepper) and stir in half an envelope onion soup mix, or something similar, then taste at the end and adjust s & p.
 Herb substitutions:
  • 1 tablespoon fresh basil, cilantro, parsley; chopped
  • 1tsp of dried herb or herb combination like Italian seasoning
 Cheese substitutions:
  • Cheddar is very nice in this.
  • Switch the cheddar out for any cheese you have/enjoy.
  • In addition to the cheese, consider toping with other garnishes, like green onion tops, snipped fresh herbs, sesame seeds, everything seasoning, even bacon bits.

A quickie

Happy New Year all!  I have only a minute but wanted to send you a quick note to say thanks for being a reader of this blog.  Know that John and I wish each of you a healthy, prosperous, and happy 2022.

Below is this week’s menu.  I’ve decided to add a Menu page to my website’s um….menu.  🙂  Look at top of the page between the Class Listing and About Us pages.  I will post it there first, before posting it anywhere else.  I did that because I know a blog post may not always happen weekly, but the menu will.

Today I have made fresh the Rotini, Sauerkraut, Tomato Soup.  I won’t be making anything else until Saturday at the earliest as there are a LOT of charcuterie orders to get filled tomorrow.  Email or text if you want to get some of those three foods.  All are super delicious.  I’ve posted some pics below the menu.

Also….this is exciting but also a challenge….I’m getting a giant new stove delivered today.  MORE BURNERS!!!

Upcoming Class

Get a new stove yourself?  Maybe an air fryer/convection toaster oven or microwave for Christmas?  Didn’t know that air fryers are the same thing as convection cooking?  

I have an upcoming class for you.

January 4 at 12 noon.  How to use convection cooking.  Only $20.  Click here to go right to booking a ticket.


Opening Fully!!

Art of Cookery is Reopening Fully for In-Person Classes

Like so many other small businesses, Art of Cookery shut down in March 2020.  Many attempts were made to provide live online classes via Zoom.   However, those classes just were not engaging public interest.

Recently, we’ve done a few small group live classes for people who are in the same “bubble” while we wore masks.  

Now, we are fully vaccinated and the CDC recommendations are that it would be safe enough to increase class sizes and allow unrelated class participants who are vaccinated to attend and no masks are required!!  That’s pretty exciting.  Unvaccinated persons cannot attend unmasked in a mixed group of unrelated persons.

There are many classes on the schedule including some youth classes.

Upcoming Classes

There are too many classes on our schedule to list them all here, and some are booked out with no more tickets available, but here is a highlight of some you may be interested in.

Pickled Asparagus on June 7th at 5:30 pm.  Learn how to make this delectable and unique local delicacy.  Learn some home canning techniques too!

Quiche on June 12 at 2 pm.  Learn tips and techniques for this quintessential brunch/breakfast dish.

Kids Young Chef Series June 14, 21, 28, July 12 & 19 at 11 am.  It is for young people ages 10-16 who are interested in truly learning how to cook.

Condiment Series: Ketchup o!n June 17 at 5:30.  Learn how to make ketchup from scratch and to control what goes into this condiment favorite.

Winner Winner Chicken Dinner on June 23 at 12 noon.  Together make this delicious and vibrant full meal…and then sit down and enjoy it at Art of Cookery

Sugar Cookies with Royal Icing on July 2 at 1 pm.  These are great to celebrate any holiday

Cookery Creations Meal Kits are A Hit

The meal kits were rolled out for orders in early May and are well received.  These aren’t boxes with whole, raw produce and proteins.  The veggies have been prepped to the recipe and much of the dinner is so close to finished that you have only a few steps. 

They tend to take between 20 to 30 minutes for a hearty, complete meal. 

The second menu set was just posted today.  Check it out!  There’s something for everyone…even a vegan option.

Make Your Own Chili Powder

Did you know chili powder is not simply powdered dry chilies? It is a blend of various spices.  Chef Valerie makes most spice blends she uses instead of purchasing them.  

Here is a great chili powder recipe.  Ideally you blend it in a small food processor or, better yet, a coffee grinder, but you don’t need to.

Chili Powder

This quick mix is a very tasty chili powder and was developed by Chef Valerie at Art of Cookery
Prep Time5 minutes
Author: vkhanson

Equipment

  • Coffee Grinder

Ingredients

  • 1 tbsp sweet paprika
  • 2.5 tsp cayenne pepper
  • 2 tsp cumin
  • 1.5 tsp paprika
  • 1.5 tsp smoked paprika
  • 1.5 tsp dried oregano
  • 1.5 tsp garlic powder
  • 1.5 tsp onion powder
  • 3/4 tsp chipotle powder
  • 1/2 tsp salt

Instructions

  • Mix everything together and pulse in coffee grinder. Store the resulting chili powder in a sealed container.

%d bloggers like this: